
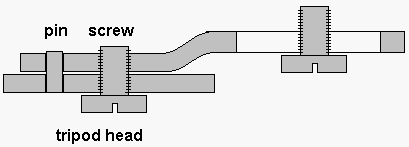
The PanoramIX mini panhead is approximately 4 inches long, 2 inches wide, and 1/4 inch thick. The "front" end has two holes, a threaded hole compatible with the mounting screw on a tripod head, and a smaller non-threaded hole for the guide pin on a tripod head.
The "back" end has a slot with a screw similar to the mounting screw on a tripod head. This screw fits into a mounting hole on the bottom of a camera. The back end is slightly higher than the front as the result of a bend (jog) in the mini-panhead.
To request a free mini-panhead, send an e-mail note to
![]()
Attach the mini-panhead securely to the head of a sturdy tripod using the standard mounting screw located in the center of the tripod head. It is preferable to use a tripod with a bubble level. When the mini-panhead has been mounted on the tripod head, the back end with the slot should be higher than the front end with the two holes, and the screw in the slot should be pointing upward.
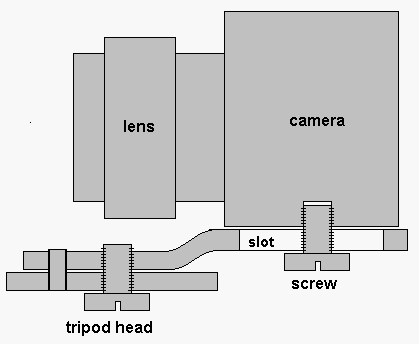
Attach the camera to the PanoramIX mini-panhead using the screw in the slot on the back end of the mini-panhead. This screw should fit into a standard mounting hole in the bottom of the body of the camera. Make sure the screw can pull the camera body snugly against the top of the mini-panhead. If the camera is still loose even after the screw can go no deeper into the mounting hole, try placing a thin piece of cardboard between the camera and the slotted end of the mini-panhead.
Make sure the camera has a focal length of no more than 40mm (for a 35 mm camera). The focal length of the lens is usually indicated on the front of the lens around the perimeter of the lens. In the case of a digital camera, refer to the "35mm equivalent focal length", not the actual focal length. Preferably, the focal length should be 30mm or less, and a focal length of 20mm or less is beneficial for capturing a larger vertical field of view.
If the mounting hole in the bottom of the camera is located in the center of the body, or directly under a line from the center of the lens to the center of the film plane, then the camera should be aimed straight ahead, parallel to the slot and the long axis of the mini-panhead. If this hole is located off to one side (not centered), then the camera must be turned to an angle so the lens points directly across the mounting screw in the front end of the mini-panhead.
The first time the camera is attached, the position of the camera in the slot must be calibrated.
Aim the camera at an object that is close to the camera (one to two feet away). If necessary, place an object near the camera, preferably something with a long vertical axis. Turn the camera so the nearby object appears near the right edge of the field of view seen through the camera. Note what part of the background is directly behind this object.
Rotate the camera to the right so the nearby object is seen to move from the right side of the field of view to the left side. Notice what happens to the background. If the background moves to the right relative to the foreground object, slide the camera back in the slot, placing the camera body father from the tripod axis. If the background moves to the left, slide the camera forward. Repeat this process until the background does not move relative to the foreground object when the camera is rotated. At this point, the lens of the camera should be located over the tripod axis. Mark the position of the camera mounting screw on the bottom of the mini-panhead to make it easy to restore this position later.
This kind of camera is very difficult to calibrate because it is impossible to see exactly what comes through the lens, unless you take some shots, have the film processed, and have prints made from the negatives. If this is not practical, slide the camera along the slot until the center of the lens is located over the axis of the tripod. These cameras tend to have tiny lenses, so you may need to push the camera as far forward as possible. The resulting position should be adequate as long as the scenes to be captured have no objects within roughly thirty feet of the camera.
Like the 35mm point and shoot cameras, these cameras are difficult to calibrate because the image to be captured cannot be seen through the "view finder". If possible, calibrate the camera somewhere close to a PC which can be connected directly to the camera and which allows the captured images to be viewed immediately. Then proceed as for a 35mm SLR camera. After finding and marking the optimum location of the camera in the slot, the connection to a PC can be removed. The camera may then be removed from the mini-panhead and re-attached later based on the optimum camera position determined by the calibration process.
If the lens of the camera is very small or very large, it may not be possible to reach the optimal position within the limits of the slot. In addition, if the mounting hole on the bottom of the camera is located far from the lens, it may be impossible to obtain an optimal calibration. In such cases, simply push the camera to the appropriate end of the slot and avoid scenes with any objects close to the camera. The resulting images, while not ideal, should be superior to images captured with the camera mounted directly on the tripod.
Place the tripod in the center of the scene and mount the camera on the tripod using the PanoramIX mini-panhead. Use the bubble level on the tripod to make sure the rotation axis is as close to vertical as possible, otherwise you may end up with an annoyingly tilted panorama.
If possible, disable any automatic exposure feature on the camera. Ideally, all photographs for a particular scene should be taken with the same exposure settings. It can be difficult to obtain a uniformly exposed set of images on a clear sunny day. For an outdoors scene, the camera will face towards the sun in one shot and away from the sun in another shot. An indoor scene with a sunny window in one direction and a dark wall in the opposite direction will also make the camera beg for exposure changes. It is possible to correct the images for exposure variations, but large corrections can cause loss of image quality.
Aim the camera at the first part of the scene and shoot the first photograph. If your lens has a focal length of 30mm or less (for a 35mm camera), rotate the camera 45 degrees to the right as accurately as possible and shoot the second image. Repeat for a total of eight images. Check each new shot to make sure the left side of each shot overlaps the right side of the previous shot. If the focal length is greater than 30mm, it may be difficult to get sufficient overlap with only 8 shots. In this case, try turning the camera 30 degrees between shots, for a total of twelve shots.
Beware of sunshine! With conventional photography, you can avoid shooting towards the sun, but this is not possible with panoramic photography because you must shoot photographs in all directions and the sun is certain to be in one of the images. As a result, overcast skies are better than clear sunny skies for panoramic photographs, even when shooting indoors in a room with windows. If there is a bright clear sunny sky, try shooting around noon when the sun is as high in the sky as possible, and possibly well above the vertical field of view. Alternatively, capture the scene from a location shaded by a large object such as a tall building.
If you use a film camera to capture the scene, have the film processed and printed, then scan the prints to create a set of digital images.
Once the scene has been reduced to a set of digital images, you can use the PanoramIX authoring tool to merge the images together into a seamless panorama. Click here to download the PanoramIX authoring tool for Windows 95, Windows NT, or PowerPC Macintosh computers.
This software has not been tested with Windows Vista, Windows 7, or Windows 8.